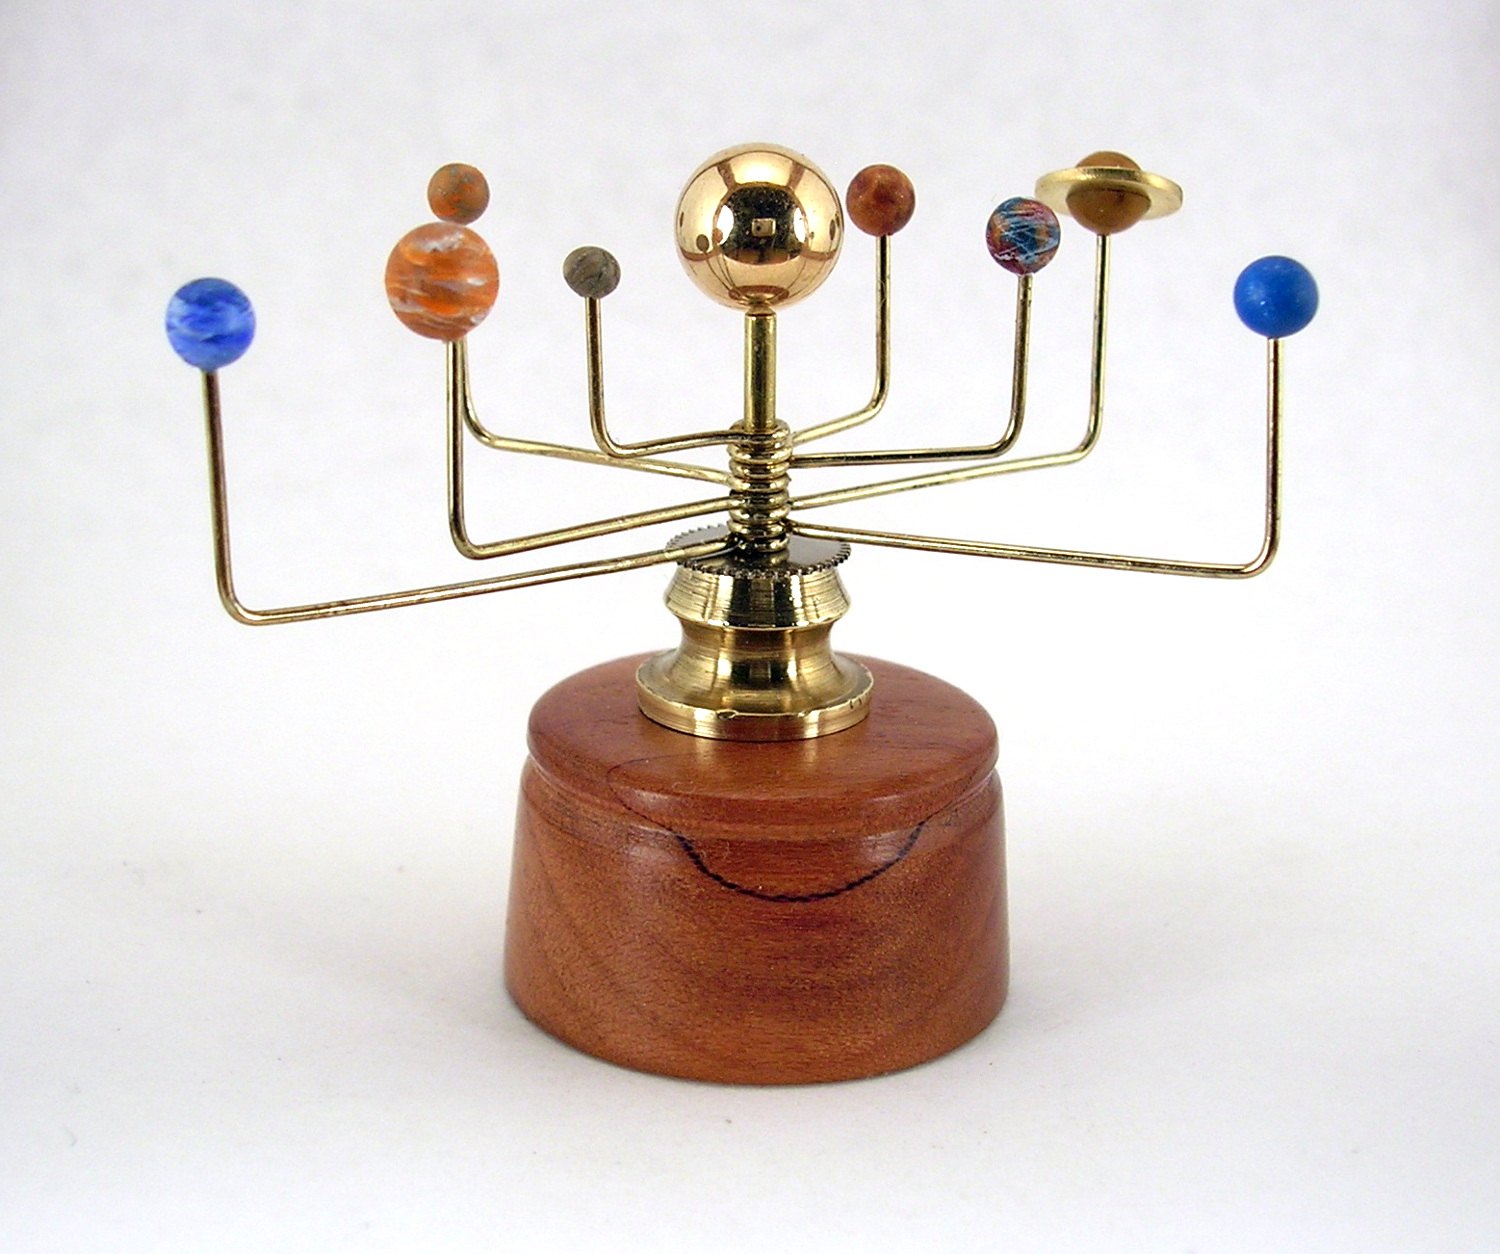
While we're about a month into the new year it occurs to me that it might be nice to look back at some of the more interesting pieces I've sold in my Etsy store in 2016. I'm actually working in some new areas of miniature sculpture and will probably produce fewer of these orrery pieces in the next year. Art is one of those things by which you have to follow your heart to a considerable extent, so I'll see where it leads me.
Showing posts with label My Art. Show all posts
Tuesday, January 31, 2017
Wednesday, December 28, 2016
How to Display Your Miniature Orrery
I recently received a nice inquiry from someone who had received one of my miniature orrery pieces as a Christmas gift. She was wondering what would be the best way to display her "small treasure". It struck me that I had never been asked that question and it would be worthwhile to discuss it here in my blog.
When I began making miniature orreries (back in 2011!) I posted them in the "OOAK dollhouse miniatures" section of eBay, where adult dollhouse collectors would find unique 1/12 scale miniatures for decoration of their dollhouses and roombox displays (I currently sell them through Etsy most of them time, BTW). I
believe most of my purchasers to date have been dollhouse enthusiasts, but I have heard from others who simply display them as interesting art pieces in their own right.
I'll admit when making them I usually envision it sitting on a tiny table or desk in a woody Victorian dollhouse library, perhaps amidst delicate lamps and tomes about steamships or Sherlock Holmes.
One reseller on Etsy placed one of my pieces inside jar-shaped rotating music box that perfectly fit the piece. I've actually considered selling some of them inside a glass "snowglobe" without the water, of course. You can purchase empty snowglobes (or "waterglobes") at this website, National Artcraft, if you wish. I've not tried this yet, but I think the one with a 3 inch interior diameter (#B) or the next one larger would be the right size for most of my pieces. It might require a bit of crafting to make one look good that way, though. I think the bases for those might be discarded, too.
Another option would be to place it in one of those glass display bells available at Hobby Lobby and Michael's. You can also buy them on Amazon. Those come in a couple of sizes. You usually need to buy the glass and the wooden base separately, but they look nice. One of those might be a bit short for your piece, though.
craft stores like
If you look around a store like Hobby Lobby, though, you can often find lovely glass boxes with soldered metal frames in various sizes. I think one of those would work very well with a piece like yours. Be sure to take a short ruler or measuring tape to the store after measuring your orrery piece.
In the next weeks I will try to post some pictures of interesting ways to display my pieces. If you have one I would love to see a picture of your way of displaying it-- or you could just use the comment section below to let me know how you show of our orrery piece.
Wade
When I began making miniature orreries (back in 2011!) I posted them in the "OOAK dollhouse miniatures" section of eBay, where adult dollhouse collectors would find unique 1/12 scale miniatures for decoration of their dollhouses and roombox displays (I currently sell them through Etsy most of them time, BTW). I
believe most of my purchasers to date have been dollhouse enthusiasts, but I have heard from others who simply display them as interesting art pieces in their own right.
I'll admit when making them I usually envision it sitting on a tiny table or desk in a woody Victorian dollhouse library, perhaps amidst delicate lamps and tomes about steamships or Sherlock Holmes.
One reseller on Etsy placed one of my pieces inside jar-shaped rotating music box that perfectly fit the piece. I've actually considered selling some of them inside a glass "snowglobe" without the water, of course. You can purchase empty snowglobes (or "waterglobes") at this website, National Artcraft, if you wish. I've not tried this yet, but I think the one with a 3 inch interior diameter (#B) or the next one larger would be the right size for most of my pieces. It might require a bit of crafting to make one look good that way, though. I think the bases for those might be discarded, too.
Another option would be to place it in one of those glass display bells available at Hobby Lobby and Michael's. You can also buy them on Amazon. Those come in a couple of sizes. You usually need to buy the glass and the wooden base separately, but they look nice. One of those might be a bit short for your piece, though.
craft stores like
If you look around a store like Hobby Lobby, though, you can often find lovely glass boxes with soldered metal frames in various sizes. I think one of those would work very well with a piece like yours. Be sure to take a short ruler or measuring tape to the store after measuring your orrery piece.
In the next weeks I will try to post some pictures of interesting ways to display my pieces. If you have one I would love to see a picture of your way of displaying it-- or you could just use the comment section below to let me know how you show of our orrery piece.
Wade
Thursday, November 3, 2016
Wade Watson Miniature Orrery N27
This is a new piece I just completed and posted yesterday. The base has some features I have not done with many of my pieces. The brass is a cut section of a larger found finial. It was necessary to keep the top of the wooden base flat, so I did a concave shape around the bottom to give it more visual balance. The trickiest part of this piece were the gears between the base area and the planet supports. Because of the narrow space there I could only use the smallest watch gears I could find. Securing the gears there was a longer story than I'll relate here, but I'll say it required a few tries and retries before I got it the way I wanted.
Friday, July 29, 2016
New Miniature Orrery Piece With a Low Profile
It's been awhile since I posted a new miniature orrery piece in my Etsy Store, but I think this one will be well received. I've done a couple of them similar to this and people seem to like the low profile base of this type. This one incorporates the last brass piece I have of this shape, so I probably won't be making any more like it.
I'm also finishing up three other new miniature orreries, but they will look fairly different from this one. With two of them I'm incorporating tiny gear assemblies that are quite challenging to finish. I hope to have them posted sometime next week. Do remember to check in at my store from time to time. I soon will also begin posting some altogether different (and, I think, very interesting) sculptural pieces that are not astronomical miniatures.
Thursday, January 7, 2016
My Favorite Orreries of 2015
In mid-year 2015 I started making new miniature orrery pieces again after taking a two year break. I opened an Etsy store that I have tried to stock with a several pieces at once, but thanks to you fine folks who have been buying them the inventory has remained very low most of the time.
I'm always looking for ways to
vary or improve my pieces. The most noticeable change I've made with the 2015 Etsy series is the way I've done the sun. In the past I had sculpted the sun from gold polymer clay, then pressed a fine powdered gold coating. I decided to give these newer pieces a more realistic look by using real gold ball for the sun. I acquired a quantity of 8mm gold ball earrings, which are just the right size and look exactly like miniature versions of vintage metal "sun" balls used in orreries. Another thing I've done to give them a more metallic feel is to incorporate tiny brass washers to serve as the planet Saturn's "rings"-- not an easy task, by the way. The designs shown here have already been sold, but show the type of work I'm currently doing. Creating miniature orreries is a very intuitive process for me, though, so I cannot say exactly where I'll go with them in the future.
Monday, July 27, 2015
New Orrery of the Week
This piece is a very realistic style of orrery created with the dollhouse miniaturist in mind. After finding a main brass base piece I liked, I drilled a hole for the main shaft. I then shined the brass a bit on the lathe and gave it a nice coat of wax. Next I turned a piece of hardwood for the lower base, which fit perfectly. I then made a small black transition cap for the top of the brass ornament, since an unwanted protrusion had been cut from it.
I normally bend a number of complete sets of brass rod planet supports and prep them at once. These also require creation and tweaking of the central loops. Having made many orreries before, I now sculpt, bake and drill planets one type at a time from Sculpy Premo polymer clay. However I wait until I’ve mounted them on the particular piece’s arm rods before adding wispy clouds to several of the planets. This is done by drybrushing with artist’s acrylics and a small brush. The sun is actually a 6 mm gold plated earring. For the central shaft I use a brass tube and the earring post is epoxied into the top hole. The bottom of the brass tube is secured to the wood base both mechanically and with epoxy.
Sunday, December 28, 2014
New Orrery Pieces Are Coming Soon
I have completed the first five of a new series of Wade Watson miniature orrery pieces and will have the available soon in a new Etsy store. These pieces all have bases of vintage brass with newly turned custom wood footings. I have added some new touches to this series and I believe these are my best work to date. I promise to have them available before the end of January and I will announce their availability here on this blog. I will post images of them here soon.
Tuesday, December 16, 2014
Wade Watson's Miniature Orreries: Creation
One thing that surprised me when I first started as a seller on eBay some years back is the great interest in dollhouse collectibles there. I've always had a great interest in models and miniatures myself and decided to consider a contribution I could make to this community that would be fairly unique. I've had a fascination with intricate mechanical devices long before the term "steampunk" came along. Marrying that with my interest in astro-science and the idea of making a miniature orrery seemed perfect.
An orrery is the name for any type of working model of astronomical bodies, usually the Sun and the planets. While some believe such devices may have been constructed in ancient times, the device with now consider the orrery seems to have emerged in the early 18th century.
I've been a polymer clay sculptor for some years, so that seemed the perfect material for the planets. I can easily size them perfectly and for most of them, the realistic planet color is created by carefully mixing colored clays. Some planets, such as Jupiter and Earth required hand painting in artist's acrylics to capture a cloud-cover effect.
From the beginning I used fine brass rod for the arm supports that hold the planets. Inspired by actual nineteenth-century orreries, I usually have the support rods at right angles, though I have done curved versions.
I've most always incorporated wood into the designs to some extent. In my most recent works wood is usually only used for the lower base. For my round bases I normally custom lathe turn the base to suit the particular design. The wood always receives several coats of rubbed on polyurethane varnish.
Several of my earliest orrery works were sculpted almost entirely from polymer clay over a wire armature. These were usually done in black clay baked with gold powder rubbed on for an aged look. I've experimented with a number of interesting orrery profiles and even tried transferring printed guides and such.
For my seventh orrery I incorporated an interesting vintage brass post I found in a box of odds and ends. That piece drew more interest than any previous design, so I decided to look for more such brass objects to incorporate. This has been my approach for most of them since. When designing a base I start with the brass piece, which always must be drilled though the center, then, usually, cut, filed, and shined to some extent. Next I conceive and turn a base to suit it. Now and then I will incorporate a turned wood piece above the brass as well.
Since most of my orreries use planets of the same size I save some time by making many planets of each type at the same time. Each planet must be carefully sculpted to the right size and shape. After they are hardened, I must hand drill them using a tiny precision drill. Needless to say, there are many rejects before I have a set of planets I like.
The most difficult planet to make is Saturn, because of it's ring area. I've used a couple of different schemes for this, but I currently am using a tiny spin-polished brass washer for the ring. The spherical planet halves must be bisected and then thinned perfectly to marry their rings. I normally spend hours working on these to end up with 8-10 that I can use.
For my earliest orreries I made the sun from polymer clay just as I did the planets. It was sculpted from gold clay, then coated with gold powder and drilled after hardening. For my latest orreries I decided to make the sun from actual gold plated metal. The sun is now actually an 8mm gold plated ball earring. I think this gives the orrery a very realistic vintage look and elevates the quality of the overall piece.
I produced a total of 40 miniature orreries from 2011 through 2013, then stopped to concentrate on other things. I am currently planning a new series of 10 works and have not decided whether to do any more after that. I do no work by commission and pretty much do these for pleasure, as well as to share with others. My orreries are in collections around the United States as well as Canada, Australia and various countries in Europe.
For this next limited series I am not only making design improvements, but experimenting with new ways to reach the those who want them. My current plan is to offer them only from an Etsy store I have yet to open. I will announce the store opening here at this website. If you enter your email address into the space in the column at left you will be notified of this and any other new post on this blog. You can also contact me directly through the contact form link at left.
An orrery is the name for any type of working model of astronomical bodies, usually the Sun and the planets. While some believe such devices may have been constructed in ancient times, the device with now consider the orrery seems to have emerged in the early 18th century.
I've been a polymer clay sculptor for some years, so that seemed the perfect material for the planets. I can easily size them perfectly and for most of them, the realistic planet color is created by carefully mixing colored clays. Some planets, such as Jupiter and Earth required hand painting in artist's acrylics to capture a cloud-cover effect.
From the beginning I used fine brass rod for the arm supports that hold the planets. Inspired by actual nineteenth-century orreries, I usually have the support rods at right angles, though I have done curved versions.
I've most always incorporated wood into the designs to some extent. In my most recent works wood is usually only used for the lower base. For my round bases I normally custom lathe turn the base to suit the particular design. The wood always receives several coats of rubbed on polyurethane varnish.
Several of my earliest orrery works were sculpted almost entirely from polymer clay over a wire armature. These were usually done in black clay baked with gold powder rubbed on for an aged look. I've experimented with a number of interesting orrery profiles and even tried transferring printed guides and such.
For my seventh orrery I incorporated an interesting vintage brass post I found in a box of odds and ends. That piece drew more interest than any previous design, so I decided to look for more such brass objects to incorporate. This has been my approach for most of them since. When designing a base I start with the brass piece, which always must be drilled though the center, then, usually, cut, filed, and shined to some extent. Next I conceive and turn a base to suit it. Now and then I will incorporate a turned wood piece above the brass as well.
Since most of my orreries use planets of the same size I save some time by making many planets of each type at the same time. Each planet must be carefully sculpted to the right size and shape. After they are hardened, I must hand drill them using a tiny precision drill. Needless to say, there are many rejects before I have a set of planets I like.
The most difficult planet to make is Saturn, because of it's ring area. I've used a couple of different schemes for this, but I currently am using a tiny spin-polished brass washer for the ring. The spherical planet halves must be bisected and then thinned perfectly to marry their rings. I normally spend hours working on these to end up with 8-10 that I can use.
For my earliest orreries I made the sun from polymer clay just as I did the planets. It was sculpted from gold clay, then coated with gold powder and drilled after hardening. For my latest orreries I decided to make the sun from actual gold plated metal. The sun is now actually an 8mm gold plated ball earring. I think this gives the orrery a very realistic vintage look and elevates the quality of the overall piece.
I produced a total of 40 miniature orreries from 2011 through 2013, then stopped to concentrate on other things. I am currently planning a new series of 10 works and have not decided whether to do any more after that. I do no work by commission and pretty much do these for pleasure, as well as to share with others. My orreries are in collections around the United States as well as Canada, Australia and various countries in Europe.
For this next limited series I am not only making design improvements, but experimenting with new ways to reach the those who want them. My current plan is to offer them only from an Etsy store I have yet to open. I will announce the store opening here at this website. If you enter your email address into the space in the column at left you will be notified of this and any other new post on this blog. You can also contact me directly through the contact form link at left.
Subscribe to:
Posts (Atom)