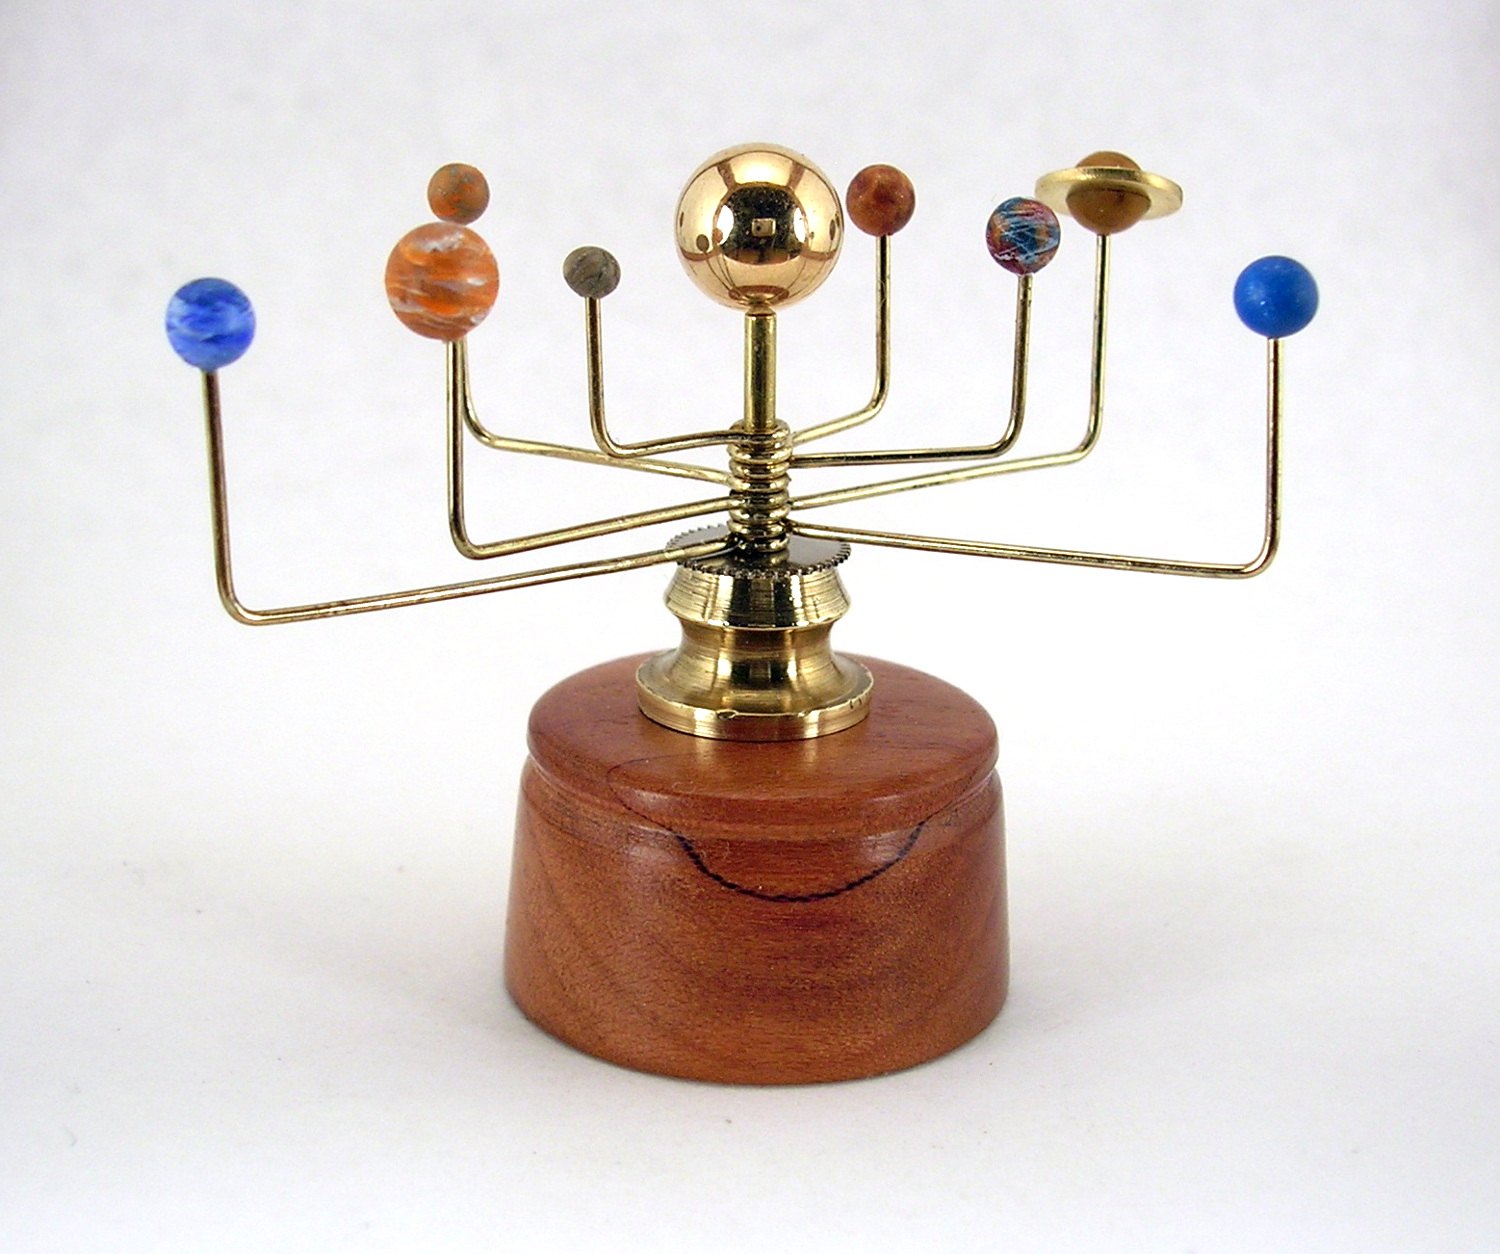
Here's just a quick note to introduce this orrery piece that I posted on Etsy this week. It has a lower profile, but features a steampunk-like geared look set into a black polymer clay section atop a modified found brass item. I made the wooden lower base a bit taller than usual for this one for a more of a woody feel. As I write this it is available at my Etsy store.
Sunday, February 26, 2017
New Miniature Orrery N40
Here's just a quick note to introduce this orrery piece that I posted on Etsy this week. It has a lower profile, but features a steampunk-like geared look set into a black polymer clay section atop a modified found brass item. I made the wooden lower base a bit taller than usual for this one for a more of a woody feel. As I write this it is available at my Etsy store.
Tuesday, January 31, 2017
Favorite Miniature Orrery Pieces of 2016
While we're about a month into the new year it occurs to me that it might be nice to look back at some of the more interesting pieces I've sold in my Etsy store in 2016. I'm actually working in some new areas of miniature sculpture and will probably produce fewer of these orrery pieces in the next year. Art is one of those things by which you have to follow your heart to a considerable extent, so I'll see where it leads me.
Wednesday, January 25, 2017
Should I Try Selling My Digital Art as a Kindle Ebook?
I manage a WordPress blog site for professional couple who enjoys creating their own blog illustration art. They do psychotherapy, blog and write how-to books. The blog has featured dozens of these drawings over the past few years. I recently received this idea from them in an email:
This was my reply:
Hi, folks.
That's a very cute idea. I like your creative thinking, but I'm going to trim it back a bit. One of the unfortunate downsides of the Internet age has been the considerable devaluation of photography and the graphic arts-- at least as a digital commodity in itself. Digital images of every sort are widely available at everyone's fingertips. Also, while the Kindle ebook medium can include graphics, it is designed such that it really works best with works that are primarily text oriented. Most of the reader devices are monotone and, also, graphics tend to create excessively large downloads.
But, while graphics may not have great direct value they do have considerable indirect value. We see one of the best uses in your blog, of course. The use of an eye-catching graphic illustration can make a big difference in the reading of a blog post.
Some very interesting new ways to use graphic artwork have emerged on the Internet in the last few years. If you've not heard the term, do a search of "infographic". An infographic is usually an entirely graphic creation consisting of both drawings and text with the purpose of making some difficult subject more easily understood. The entire graphic tends to be the full width of a blog column and is often very long vertically. The infographic typically makes it's debut as a blog post, but then is (hopefully) spread around the web as a social media "meme". It generally includes a website name and sometimes is accompanied by a link to the source website. These make for very valuable indirect promotional tools.
So the irony of digital art is that while there is little to be earned by it in it's direct form, there is an ever growing demand for it. New uses are constantly being conceived, so keep thinking. Anyway, this reply is going long, as usual, but I hope it gives you food for thought. We live in a rapidly changing time and even artists must adjust to these changes.
Wade
------
Infographic: "Creative Commons - What does it mean?" is copyright (c) 2014 Martin Missfeldt / Bildersuche.org and made available under a Creative Commons Attribution-Share Alike 3.0 Unported license.
Let’s talk about an idea we’ve had that might bring in some more money – hope hope! We are wondering if we could do a little book called “Heart Art” and put it on Amazon where it might attract people looking for gifts for Valentine’s Day, Anniversaries, Birthdays, Love Gifts for special occasions, etc.
This was my reply:
Hi, folks.
That's a very cute idea. I like your creative thinking, but I'm going to trim it back a bit. One of the unfortunate downsides of the Internet age has been the considerable devaluation of photography and the graphic arts-- at least as a digital commodity in itself. Digital images of every sort are widely available at everyone's fingertips. Also, while the Kindle ebook medium can include graphics, it is designed such that it really works best with works that are primarily text oriented. Most of the reader devices are monotone and, also, graphics tend to create excessively large downloads.
But, while graphics may not have great direct value they do have considerable indirect value. We see one of the best uses in your blog, of course. The use of an eye-catching graphic illustration can make a big difference in the reading of a blog post.
Some very interesting new ways to use graphic artwork have emerged on the Internet in the last few years. If you've not heard the term, do a search of "infographic". An infographic is usually an entirely graphic creation consisting of both drawings and text with the purpose of making some difficult subject more easily understood. The entire graphic tends to be the full width of a blog column and is often very long vertically. The infographic typically makes it's debut as a blog post, but then is (hopefully) spread around the web as a social media "meme". It generally includes a website name and sometimes is accompanied by a link to the source website. These make for very valuable indirect promotional tools.
So the irony of digital art is that while there is little to be earned by it in it's direct form, there is an ever growing demand for it. New uses are constantly being conceived, so keep thinking. Anyway, this reply is going long, as usual, but I hope it gives you food for thought. We live in a rapidly changing time and even artists must adjust to these changes.
Wade
------
Infographic: "Creative Commons - What does it mean?" is copyright (c) 2014 Martin Missfeldt / Bildersuche.org and made available under a Creative Commons Attribution-Share Alike 3.0 Unported license.
Saturday, January 7, 2017
Putty Compounds for Model Making and Miniatures
I employ a variety of materials in making my miniature sculptures. For me the most reliable adhesives and fillers seem to be the two part epoxy types. Today I did a little checking around of what many artists and model makers seem to prefer. I came up with list and thought it might be useful to readers of this blog.
Aves Apoxie Sculpt - This one's the most common putty recommended by modelers for smooth figure
model work and such. Some say it hardens very hard such as to be difficult to sand once fully cured, though. It's a bit pricier than some of the other options, though.

Magic Sculpt - Lately I've been using one called "Magic Sculpt by Wesco", which I bought economically on eBay in a small quantity. It's worked very well for me. When mixed well in equal parts, it solidifies very solidly in an hour or two and is reasonably sandable. It's also very strong. I've based my brass rods in it in making my orreries and it holds quite well.

Bondo - Award winning modeler Lou Dalmaso seems to prefer Bondo much of the time in his weekly modeling videos. From scanning the forums, I think most guys buy the small 4.5 oz tube of premixed called "Bondo 907 Glazing and Spot Putty". It's intended for auto body work and may not be great for use on some plastics. Some guys say they prime before using it. Some quotes found: "The best way to apply the Bondo is with toothpicks." "The best way to shape the Bondo is to use small pieces of 220 sandpaper. I find that working with small pieces about 1"x1"."

Hardware store epoxy putty (like Rectorseal EP-200) - Lou Dalmaseo doesn't use these for filler as much as an adhesive in building resin models. He finds regular 2-part epoxy too runny for some use, so he uses this in it's place. For instance, he used this type of putty in attaching starship nacelles because it seems to hold the part pretty firmly in place. He does try to scrape off excess, then sand it later and uses other fillers for final smoothing. In my own use of this type of putty, I found it super hard and strong, but set too fast and was very hard to sand or work once hardened. Perhaps hardness varies by brand.
Squadron Green Putty - Single part putty in a small tube that many modelers like a lot. One guy said
it can be thinned and smoothed with Testor's liquid model glue.
Milliput - This is another 2-part putty some modelers prefer.

Sikkens Kombi Putty - One modeler called this "the best spot putty on the planet". He sometimes uses Evercoat body filler for large areas, then then skims the top with Sikkens. He says he buys the smallest size and you have to get it from an automotive paint jobber that sells Sikkens products. I found a product sold online called Pronto Kombi Spot Putty that may be the same thing, but we'll have to try it out sometime.

Tamiya putty - One modeler says this "buries" Bondo, though he uses both.
Aves Apoxie Sculpt - This one's the most common putty recommended by modelers for smooth figure
model work and such. Some say it hardens very hard such as to be difficult to sand once fully cured, though. It's a bit pricier than some of the other options, though.
UPDATE: Aves is the best sculpting two part putty I've used for capturing fine detail, but it's not the strongest. Thin or narrow parts can be a bit too fragile.
UPDATE: I've used this one part Bondo product several times now. It is a nice hard putty, but can be quite runny out of the tube. It also has a pretty strong odor, so I only use it in the garage.
UPDATE: I've had a lot of shelf life problems with this product. You really need to use it fairly soon after opening or at least one part seems to turn hard before you know it.
Squadron Green Putty - Single part putty in a small tube that many modelers like a lot. One guy said
it can be thinned and smoothed with Testor's liquid model glue.
Milliput - This is another 2-part putty some modelers prefer.
Sikkens Kombi Putty - One modeler called this "the best spot putty on the planet". He sometimes uses Evercoat body filler for large areas, then then skims the top with Sikkens. He says he buys the smallest size and you have to get it from an automotive paint jobber that sells Sikkens products. I found a product sold online called Pronto Kombi Spot Putty that may be the same thing, but we'll have to try it out sometime.
Tamiya putty - One modeler says this "buries" Bondo, though he uses both.
UPDATE:
Pratley Steel Putty - I needed as strong a putty as I could find for use on a model car axle and this filled the bill well. It's a two part putty that comes in a fairly small package, but it's the strongest putty I've used.
Wednesday, December 28, 2016
How to Display Your Miniature Orrery
I recently received a nice inquiry from someone who had received one of my miniature orrery pieces as a Christmas gift. She was wondering what would be the best way to display her "small treasure". It struck me that I had never been asked that question and it would be worthwhile to discuss it here in my blog.
When I began making miniature orreries (back in 2011!) I posted them in the "OOAK dollhouse miniatures" section of eBay, where adult dollhouse collectors would find unique 1/12 scale miniatures for decoration of their dollhouses and roombox displays (I currently sell them through Etsy most of them time, BTW). I
believe most of my purchasers to date have been dollhouse enthusiasts, but I have heard from others who simply display them as interesting art pieces in their own right.
I'll admit when making them I usually envision it sitting on a tiny table or desk in a woody Victorian dollhouse library, perhaps amidst delicate lamps and tomes about steamships or Sherlock Holmes.
One reseller on Etsy placed one of my pieces inside jar-shaped rotating music box that perfectly fit the piece. I've actually considered selling some of them inside a glass "snowglobe" without the water, of course. You can purchase empty snowglobes (or "waterglobes") at this website, National Artcraft, if you wish. I've not tried this yet, but I think the one with a 3 inch interior diameter (#B) or the next one larger would be the right size for most of my pieces. It might require a bit of crafting to make one look good that way, though. I think the bases for those might be discarded, too.
Another option would be to place it in one of those glass display bells available at Hobby Lobby and Michael's. You can also buy them on Amazon. Those come in a couple of sizes. You usually need to buy the glass and the wooden base separately, but they look nice. One of those might be a bit short for your piece, though.
craft stores like
If you look around a store like Hobby Lobby, though, you can often find lovely glass boxes with soldered metal frames in various sizes. I think one of those would work very well with a piece like yours. Be sure to take a short ruler or measuring tape to the store after measuring your orrery piece.
In the next weeks I will try to post some pictures of interesting ways to display my pieces. If you have one I would love to see a picture of your way of displaying it-- or you could just use the comment section below to let me know how you show of our orrery piece.
Wade
When I began making miniature orreries (back in 2011!) I posted them in the "OOAK dollhouse miniatures" section of eBay, where adult dollhouse collectors would find unique 1/12 scale miniatures for decoration of their dollhouses and roombox displays (I currently sell them through Etsy most of them time, BTW). I
believe most of my purchasers to date have been dollhouse enthusiasts, but I have heard from others who simply display them as interesting art pieces in their own right.
I'll admit when making them I usually envision it sitting on a tiny table or desk in a woody Victorian dollhouse library, perhaps amidst delicate lamps and tomes about steamships or Sherlock Holmes.
One reseller on Etsy placed one of my pieces inside jar-shaped rotating music box that perfectly fit the piece. I've actually considered selling some of them inside a glass "snowglobe" without the water, of course. You can purchase empty snowglobes (or "waterglobes") at this website, National Artcraft, if you wish. I've not tried this yet, but I think the one with a 3 inch interior diameter (#B) or the next one larger would be the right size for most of my pieces. It might require a bit of crafting to make one look good that way, though. I think the bases for those might be discarded, too.
Another option would be to place it in one of those glass display bells available at Hobby Lobby and Michael's. You can also buy them on Amazon. Those come in a couple of sizes. You usually need to buy the glass and the wooden base separately, but they look nice. One of those might be a bit short for your piece, though.
craft stores like
If you look around a store like Hobby Lobby, though, you can often find lovely glass boxes with soldered metal frames in various sizes. I think one of those would work very well with a piece like yours. Be sure to take a short ruler or measuring tape to the store after measuring your orrery piece.
In the next weeks I will try to post some pictures of interesting ways to display my pieces. If you have one I would love to see a picture of your way of displaying it-- or you could just use the comment section below to let me know how you show of our orrery piece.
Wade
Thursday, November 3, 2016
Wade Watson Miniature Orrery N27
This is a new piece I just completed and posted yesterday. The base has some features I have not done with many of my pieces. The brass is a cut section of a larger found finial. It was necessary to keep the top of the wooden base flat, so I did a concave shape around the bottom to give it more visual balance. The trickiest part of this piece were the gears between the base area and the planet supports. Because of the narrow space there I could only use the smallest watch gears I could find. Securing the gears there was a longer story than I'll relate here, but I'll say it required a few tries and retries before I got it the way I wanted.
Friday, July 29, 2016
New Miniature Orrery Piece With a Low Profile
It's been awhile since I posted a new miniature orrery piece in my Etsy Store, but I think this one will be well received. I've done a couple of them similar to this and people seem to like the low profile base of this type. This one incorporates the last brass piece I have of this shape, so I probably won't be making any more like it.
I'm also finishing up three other new miniature orreries, but they will look fairly different from this one. With two of them I'm incorporating tiny gear assemblies that are quite challenging to finish. I hope to have them posted sometime next week. Do remember to check in at my store from time to time. I soon will also begin posting some altogether different (and, I think, very interesting) sculptural pieces that are not astronomical miniatures.
Sunday, June 5, 2016
Super Moon in My Room
My favorite Giz Wiz, Dick DeBartolo recently did an interesting video demonstrating an astronomical gadget I’ve never heard of called “Super Moon in My Room” by Uncle Milton. It’s basically a twelve inch plastic wallhanging relief of the moon. However, as is often the case with gadgets these days, it contains some high tech electronics. It lights up to simulate the various phases of the moon. A clock/calendar circuit enables these to be coordinated with the real moon outside. In addition to just being a fun gadget, I think this would be a great gift for someone bedridden who is unable to go out and see the real moon.
The Uncle Milton company seems to specialize in astronomical devices and also makes a ceiling-hangable orrery for kids to learn about the planets. I always love running across a new orrery.
Thursday, January 7, 2016
My Favorite Orreries of 2015
In mid-year 2015 I started making new miniature orrery pieces again after taking a two year break. I opened an Etsy store that I have tried to stock with a several pieces at once, but thanks to you fine folks who have been buying them the inventory has remained very low most of the time.
I'm always looking for ways to
vary or improve my pieces. The most noticeable change I've made with the 2015 Etsy series is the way I've done the sun. In the past I had sculpted the sun from gold polymer clay, then pressed a fine powdered gold coating. I decided to give these newer pieces a more realistic look by using real gold ball for the sun. I acquired a quantity of 8mm gold ball earrings, which are just the right size and look exactly like miniature versions of vintage metal "sun" balls used in orreries. Another thing I've done to give them a more metallic feel is to incorporate tiny brass washers to serve as the planet Saturn's "rings"-- not an easy task, by the way. The designs shown here have already been sold, but show the type of work I'm currently doing. Creating miniature orreries is a very intuitive process for me, though, so I cannot say exactly where I'll go with them in the future.
Monday, July 27, 2015
New Orrery of the Week
This piece is a very realistic style of orrery created with the dollhouse miniaturist in mind. After finding a main brass base piece I liked, I drilled a hole for the main shaft. I then shined the brass a bit on the lathe and gave it a nice coat of wax. Next I turned a piece of hardwood for the lower base, which fit perfectly. I then made a small black transition cap for the top of the brass ornament, since an unwanted protrusion had been cut from it.
I normally bend a number of complete sets of brass rod planet supports and prep them at once. These also require creation and tweaking of the central loops. Having made many orreries before, I now sculpt, bake and drill planets one type at a time from Sculpy Premo polymer clay. However I wait until I’ve mounted them on the particular piece’s arm rods before adding wispy clouds to several of the planets. This is done by drybrushing with artist’s acrylics and a small brush. The sun is actually a 6 mm gold plated earring. For the central shaft I use a brass tube and the earring post is epoxied into the top hole. The bottom of the brass tube is secured to the wood base both mechanically and with epoxy.
Sunday, December 28, 2014
New Orrery Pieces Are Coming Soon
I have completed the first five of a new series of Wade Watson miniature orrery pieces and will have the available soon in a new Etsy store. These pieces all have bases of vintage brass with newly turned custom wood footings. I have added some new touches to this series and I believe these are my best work to date. I promise to have them available before the end of January and I will announce their availability here on this blog. I will post images of them here soon.
Tuesday, December 16, 2014
Wade Watson's Miniature Orreries: Creation
One thing that surprised me when I first started as a seller on eBay some years back is the great interest in dollhouse collectibles there. I've always had a great interest in models and miniatures myself and decided to consider a contribution I could make to this community that would be fairly unique. I've had a fascination with intricate mechanical devices long before the term "steampunk" came along. Marrying that with my interest in astro-science and the idea of making a miniature orrery seemed perfect.
An orrery is the name for any type of working model of astronomical bodies, usually the Sun and the planets. While some believe such devices may have been constructed in ancient times, the device with now consider the orrery seems to have emerged in the early 18th century.
I've been a polymer clay sculptor for some years, so that seemed the perfect material for the planets. I can easily size them perfectly and for most of them, the realistic planet color is created by carefully mixing colored clays. Some planets, such as Jupiter and Earth required hand painting in artist's acrylics to capture a cloud-cover effect.
From the beginning I used fine brass rod for the arm supports that hold the planets. Inspired by actual nineteenth-century orreries, I usually have the support rods at right angles, though I have done curved versions.
I've most always incorporated wood into the designs to some extent. In my most recent works wood is usually only used for the lower base. For my round bases I normally custom lathe turn the base to suit the particular design. The wood always receives several coats of rubbed on polyurethane varnish.
Several of my earliest orrery works were sculpted almost entirely from polymer clay over a wire armature. These were usually done in black clay baked with gold powder rubbed on for an aged look. I've experimented with a number of interesting orrery profiles and even tried transferring printed guides and such.
For my seventh orrery I incorporated an interesting vintage brass post I found in a box of odds and ends. That piece drew more interest than any previous design, so I decided to look for more such brass objects to incorporate. This has been my approach for most of them since. When designing a base I start with the brass piece, which always must be drilled though the center, then, usually, cut, filed, and shined to some extent. Next I conceive and turn a base to suit it. Now and then I will incorporate a turned wood piece above the brass as well.
Since most of my orreries use planets of the same size I save some time by making many planets of each type at the same time. Each planet must be carefully sculpted to the right size and shape. After they are hardened, I must hand drill them using a tiny precision drill. Needless to say, there are many rejects before I have a set of planets I like.
The most difficult planet to make is Saturn, because of it's ring area. I've used a couple of different schemes for this, but I currently am using a tiny spin-polished brass washer for the ring. The spherical planet halves must be bisected and then thinned perfectly to marry their rings. I normally spend hours working on these to end up with 8-10 that I can use.
For my earliest orreries I made the sun from polymer clay just as I did the planets. It was sculpted from gold clay, then coated with gold powder and drilled after hardening. For my latest orreries I decided to make the sun from actual gold plated metal. The sun is now actually an 8mm gold plated ball earring. I think this gives the orrery a very realistic vintage look and elevates the quality of the overall piece.
I produced a total of 40 miniature orreries from 2011 through 2013, then stopped to concentrate on other things. I am currently planning a new series of 10 works and have not decided whether to do any more after that. I do no work by commission and pretty much do these for pleasure, as well as to share with others. My orreries are in collections around the United States as well as Canada, Australia and various countries in Europe.
For this next limited series I am not only making design improvements, but experimenting with new ways to reach the those who want them. My current plan is to offer them only from an Etsy store I have yet to open. I will announce the store opening here at this website. If you enter your email address into the space in the column at left you will be notified of this and any other new post on this blog. You can also contact me directly through the contact form link at left.
An orrery is the name for any type of working model of astronomical bodies, usually the Sun and the planets. While some believe such devices may have been constructed in ancient times, the device with now consider the orrery seems to have emerged in the early 18th century.
I've been a polymer clay sculptor for some years, so that seemed the perfect material for the planets. I can easily size them perfectly and for most of them, the realistic planet color is created by carefully mixing colored clays. Some planets, such as Jupiter and Earth required hand painting in artist's acrylics to capture a cloud-cover effect.
From the beginning I used fine brass rod for the arm supports that hold the planets. Inspired by actual nineteenth-century orreries, I usually have the support rods at right angles, though I have done curved versions.
I've most always incorporated wood into the designs to some extent. In my most recent works wood is usually only used for the lower base. For my round bases I normally custom lathe turn the base to suit the particular design. The wood always receives several coats of rubbed on polyurethane varnish.
Several of my earliest orrery works were sculpted almost entirely from polymer clay over a wire armature. These were usually done in black clay baked with gold powder rubbed on for an aged look. I've experimented with a number of interesting orrery profiles and even tried transferring printed guides and such.
For my seventh orrery I incorporated an interesting vintage brass post I found in a box of odds and ends. That piece drew more interest than any previous design, so I decided to look for more such brass objects to incorporate. This has been my approach for most of them since. When designing a base I start with the brass piece, which always must be drilled though the center, then, usually, cut, filed, and shined to some extent. Next I conceive and turn a base to suit it. Now and then I will incorporate a turned wood piece above the brass as well.
Since most of my orreries use planets of the same size I save some time by making many planets of each type at the same time. Each planet must be carefully sculpted to the right size and shape. After they are hardened, I must hand drill them using a tiny precision drill. Needless to say, there are many rejects before I have a set of planets I like.
The most difficult planet to make is Saturn, because of it's ring area. I've used a couple of different schemes for this, but I currently am using a tiny spin-polished brass washer for the ring. The spherical planet halves must be bisected and then thinned perfectly to marry their rings. I normally spend hours working on these to end up with 8-10 that I can use.
For my earliest orreries I made the sun from polymer clay just as I did the planets. It was sculpted from gold clay, then coated with gold powder and drilled after hardening. For my latest orreries I decided to make the sun from actual gold plated metal. The sun is now actually an 8mm gold plated ball earring. I think this gives the orrery a very realistic vintage look and elevates the quality of the overall piece.
I produced a total of 40 miniature orreries from 2011 through 2013, then stopped to concentrate on other things. I am currently planning a new series of 10 works and have not decided whether to do any more after that. I do no work by commission and pretty much do these for pleasure, as well as to share with others. My orreries are in collections around the United States as well as Canada, Australia and various countries in Europe.
For this next limited series I am not only making design improvements, but experimenting with new ways to reach the those who want them. My current plan is to offer them only from an Etsy store I have yet to open. I will announce the store opening here at this website. If you enter your email address into the space in the column at left you will be notified of this and any other new post on this blog. You can also contact me directly through the contact form link at left.
Thursday, December 4, 2014
My Name is Wade Watson
My name is Wade Watson and this is blog-style website I decided to create about art-- my own art and that of others that interests me. Art has always been an integral aspect of my life whether it was my primary occupation or not. One of my earliest memories is my first experience with watercolor painting. I was a toddler and at the kitchen table of my next door neighbor, Amy, painting with her. The first thing I did was drop a huge glob of brown paint right in the middle. When Amy's mother, Jean, asked me what it was, I said it was God dropping food to Earth. I suppose I didn't entirely understand grocery stores just yet. I painted clouds above the glob and ground below it. The point was, though, that I converged a random "accident" with creation and made a work from that. To me this is the essence of art. Our lives are totally at the mercy of random events that can be seen as either disasters or spring points for creative action. Art can never be entirely an intellectual creation, but must emerge from those "accidents" that force us to express our innermost feelings and ideas.
Subscribe to:
Posts (Atom)